
Introduction to Spark
Spark is a unified engine for distributed data processing. It supports both on premise and cloud installation. Applications written in Spark can automatically scale to all the available nodes of a cluster to parallelize heavy data processing tasks, be it for Data Engineering, Data Science, Machine Learning or Deep Learning.
Spark consists of following four main libraries (as shown in Figure below)
- Spark SQL (Dataframes and Datasets)
- Spark Streaming (Structured Streaming)
- Machine Learning (MLlib)
- Graph Processing (GraphX)
Each of the above four components are separate from Spark’s core fault-tolerant engine, which provides the APIs (in either JAVA, Python, Scala or SQL) to write Spark applications that converts it into a DAG (Directed Acyclic Graph) that is executed by the core engine.
Spark code is decomposed into highly compact bytecode that is executed by the JVMs running on each worker node on the spark cluster
Spark provides in-memory storage on worker nodes in the cluster for intermediate computations, making it much faster than Hadoop MapReduce, which does not make use of the worker node memory.
Spark provides support for following programming languages:
- Scala
- SQL
- Python
- Java
- R
There are four main characteristics of the design philosophy of Spark:
- Speed
- Ease of Use
- Modularity
- Extensibility
It is so widely acclaimed that the original creators of Spark even got an ACM award for their paper describing Spark as a Unified Engine for Big Data Processing.
Who should use it?
Data Scientists
Spark can easily perform tasks like Clustering, Build Machine Learning models using MLLib library and even Deep Learning.
Apache Spark 2.4 introduced a new gang scheduler, as part of project Hydrogen, to accommodate the fault tolerant requirements for training and scheduling deep learning modes in a distributed manner and Spark 3.0 even added support for worker nodes with GPUs.
Data Engineers
Data engineers often need to process large amounts of raw data so that it can be made usable for further analysis by Data Scientists. Spark provides a simple way to utilize the power of parallel computations to process large amounts of data and hides all the complexity of distribution and fault tolerance.
Spark 2.x introduced evolutionary streaming model called continuous applications with Structured Streaming, which enables data engineers to build complex data pipelines to perform ETL from both real time and static data sources.
Catalyst optimizer for SQL and Tungsten for compact code generation has enabled much better performance in Spark 2.x and Spark 3.0
PySpark Installation – Local
Although the real benefit of spark comes from using it on a cluster of computers, for learning purposes it is very straightforward to install it locally on windows, mac or linux. For up to date instructions please follow the steps mentioned in spark documentation. I will describe the way I installed PySpark it on my windows computer below. You can even choose to work in Spark using Scala, R , SQL or Java. And if you want an easy to use cluster based installation, DataBricks is the best option to go with
Getting up and running on Windows
Pre-requisites– Anaconda is already installed on your computer.
Step 1:- Open Command prompt on your windows machine
Step 2:- Create a new conda virtual environment named spark (you can name anything you want)
conda create -n spark python=3
Step 3:- Activate the newly created virtual environment
conda activate spark
Step 4:- Install pyspark using pip install
pip install pyspark
Step 5:- Once successfully installed you can check by typing pyspark on your command prompt, you should get the below output
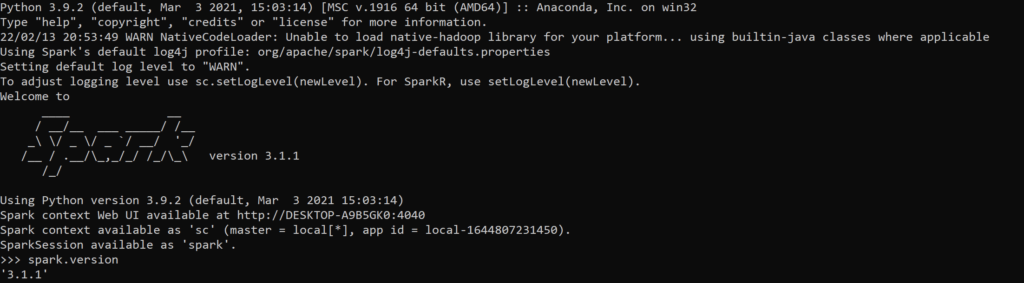
And that is it! It’s that simple.
Now for experimentation, I prefer to use Jupyter notebook. You can use VS code or any other editor of your choice. If you also want to use Jupyter notebook, you can install Jupyter lab if not already installed in your spark virtual environment.
pip install jupyterlab
Now you can start your Jupyter notebook by below command and it will automatically open a new browser tab. Please follow other tutorials if you are new to Jupyter notebooks.
jupyter lab
I use the following code to test my installation(this code might not be as per Spark3.0 but it works and tests the spark installation by calculating the value of pi). You can also run it in your notebook cell
%%time

import findspark
findspark.init()

import pyspark
sc = pyspark.SparkContext(appName="myAppName")

import random
NUM_SAMPLES = 1000
def inside(p):
    x, y = random.random(), random.random()
    return x*x + y*y < 1
count = sc.parallelize(range(0, NUM_SAMPLES)).filter(inside).count()
print ("Pi is roughly %f" % (4.0 * count / NUM_SAMPLES))
Understanding Spark High Level Architecture

Spark Application
It is the topmost abstraction layer of a spark program. The spark application creates the spark driver, which manages the parallel operations on the spark cluster via the Spark Session. The driver uses Spark session to accesses the cluster manager and spark executor.
Spark Driver
Spark Driver is the main orchestrator of the overall program execution. It creates the Spark session and performs the following duties:
- Coordinates with cluster manager to request hardware resources(CPU, Mem etc) for the Spark’s executors(JVMs)
- Converts all Spark operations into DAGs (Directed Acyclic Graphs)
- Schedules the DAGs
- Distributes the individual tasks in the DAGs across Spark executors
- After resource allocation is done, it communicates directly with the Spark Executors
Spark Session
Spark session is the single unified entry point to all of Spark’s functionality. Through this you can create JVM runtime parameters, defined DataFrames and Datasets, read from data sources, access catalog metadata and issue Spark SQL queries.
Since Spark 2.0, it subsumed all the previous entry points to Spark like SparkContext, SQLContext, StreamingContext etc. and became the single entry point for all of Spark’s functionality. However for backward compatibility you can still access these contexts directly.
Spark session is automatically created when you start the spark shell and can be accessed using a global variable called sc. For standalone applications you can create Spark session using high level APIs
Cluster Manager
Spark supports following four cluster managers, which are responsible for managing and allocating cluster resources to the Spark application:
- Built-in Standalone cluster manager
- Apache Hadoop YARN
- Apache Mesos
- Kubernetes
Spark may add support for a new cluster manager in future as and when they become popular
Spark Executor
This is the work horse of the Spark application. It runs on each worker node and is responsible for executing individual tasks. Primarily it performs following duties:
- Communicate with Driver program
- Execute tasks on workers
Each executor has the same number of executor cores as the CPU’s logical processor count. It means it can execute that many tasks in parallel on a single worker node. When you run locally the number of executor cores you will see will be the number of logical processor on your machine.
Understanding Data Partitions
In order to understand Spark’s execution strategy, we need to understand how spark treats the data it processes. In a cluster setup and big data applications, the data are stored in multiple partitions distributed across the physical cluster.
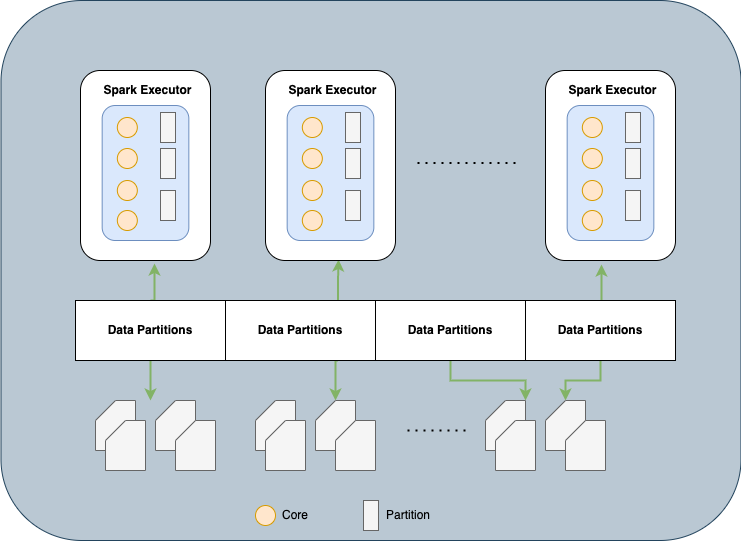
Spark treats each partition as a high-level logical data abstraction i.e. as a DataFrame in memory. Then uses this logical Data model to allocate individual spark executor that reads and processes data closest to it in the network, observing data locality
Understanding Jobs, Stages and Tasks
Below diagram shows the hierarchy of execution steps Spark application takes to execute the high level commands coded in your application.
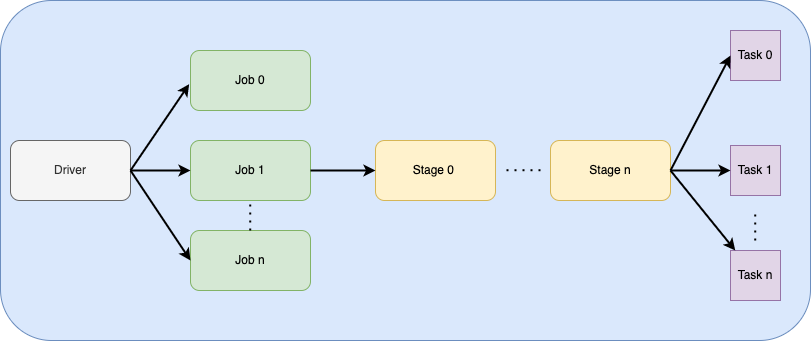
Jobs
First of all, Spark Driver converts the Spark application into one ore more jobs depending on the number of high level APIs the Spark application has called for. Then it transforms each job into a DAG, which is like the execution plan generated by Spark
Stages
Then as part of the DAG nodes, different stages are created based on what operations can be performed serially or parallelly. Most of the times a stage boundary is governed by the computation boundary i.e. if data transfer is needed among spark executors to continue the next operation.
Tasks
Each Stage consists of Spark Tasks (a single unit of execution), which are then assigned to individual Spark executor core, which in turn works on a single partition of data. Therefore, for example, an executor with 12 cores can have 12 or more tasks working on 12 or more partitions in parallel, unleashing the unlimited processing power of a Spark application.
Running your first parallel computation
Now that we have covered basic Spark concepts and completed local installation, we are now ready to write our first Spark application. Let’s fire up our Jupyter notebook and get cracking!
In this example we will use a Kaggle Dataset for car sales provided by Car Dekho. You can download the csv file from Kaggle at below link. You might need to create a Kaggle account, which is free if you don’t already have one
After downloading the data file I renamed it to replace spaces with “_”.
The purpose of this example is the calculate the count of cars on sale for each fuel type, pretty simple. Below is the code to do that with comments
#Create a spark Session and import required functions
from pyspark.sql import SparkSession
from pyspark.sql.functions import *
spark = (SparkSession
        .builder
        .appName('CarAnalysis')
        .getOrCreate())

#Read the cars dataset
cars_df = (spark.read.format("csv")
           .option("header","true")
           .option("inferSchema","true")
           .load('CAR_DETAILS_FROM_CAR_DEKHO.csv'))

#Take a peek at the dataset (first 10 rows)
cars_df.show(10,truncate=False)
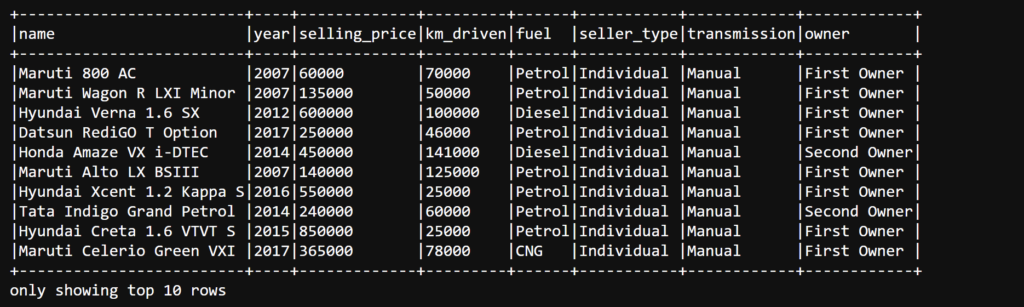
#Aggregate to the count of cars for sale for each fuel type
cars_count_by_fuel_type = (cars_df
                          .select("fuel")
                          .where(col("fuel").isNotNull())
                          .groupBy("fuel")
                          .count()
                          .orderBy(desc("count"))
                          .show())

As expected there are slightly more number of Diesel cars for sale because Diesel is cheaper in India where Car Dekho is based.
Now this seemed pretty straightforward and you can easily do this in Pandas as well. But the power of Spark will be felt when you will have millions of records in your dataset. Spark will parallelize its aggregate operation in this example to run on multiple worker nodes.
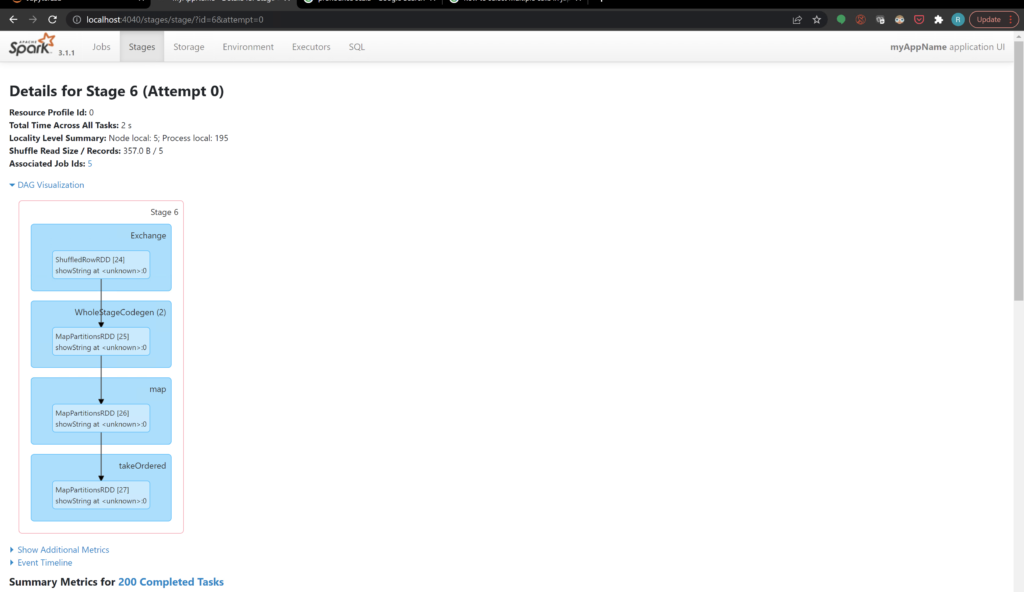
Spark UI
After running the above application open the Spark UI using below URL in your browser
You will see the details on how Spark processed your application. How many Jobs, Stages and Tasks it was divided into. What the DAG nodes looked like and how long did it take to execute each stage. I will cover this UI in detail in upcoming posts. But for now you can play around it and see the options available. Below is the screenshot of the DAG for our example applicaiton
Conclusion
In this article I covered on how to get started with Spark, PySpark in particular. We covered local installation, basic architecture and execution concepts along with one example application. In upcoming posts I will dive deeper into Spark’s execution model and look at important high level Structured APIs like DataFrames and Datasets. Until then Sparkle!!
Let me know your feedback in the comments below.
Thank you for simplifying the concepts and explaining so well! Looking forward to your post on how to interpret Spark UI